|
1.FreeNAS 是基于 FreeBSD 的 2. 3. 4. 操作系统版本选择“FreeBSD“ 因为我下载的 FreeNAS 的版本是 32 位的,所以这里选择 “FreeBSD”。 如果你下载的 FreeNAS 的版本是 64 位的,要选择 "FreeBSD 64位"。 5. 6.选择处理器 7. 内存配置为 1G 就够用了 8. 9. 10. 虚拟磁盘类型-->SCSI(S) 11. 12. 磁盘大小设置为 10G 就够用了,因为这块盘上仅安装 FreeNAS 系统,不需要太大空间。 13. 14. 点击“自定义硬件” 15. 删除不必要的设备,如 USB 控制器、声卡。 16. 点击“关闭” 17. 点击“完成” 18. 点击 “编辑虚拟机设置”,添加用于存储数据的硬盘。 19. 点击 "添加" 20. 点击 "硬盘" --> 点击 "下一步" 21. 选择 "SCSI(S)" --> 点击 "下一步" 22. 23. 磁盘容量设置为 100G 24. 点击 "完成" 25. 重复 19-24 的步骤,再添加 3 块同样的磁盘,添加完成后入下图所示。 二、安装 FreeNAS 26. 27. 28. 选择大小为 10G 的硬盘 29. 选择 "Yes",键入回车确认。 30. 31. 32. 三、配置 FreeNAS 33. 34. 35. 36. 37. 38. 确认 FreeNAS 可以和宿主机通信 40. 右上角 Alert 图标有告警,点击查看,提示你修改 admin 用户密码。 41. 42. 修改 admin 用户密码 43. 密码修改成功 44. 45. 添加卷 卷类型说明: - Stripe: 至少需要一个磁盘
- Mirror: 至少需要两个磁盘
- RAIDZ1: 至少需要三个磁盘
- RAIDZ2: 至少需要四个磁盘
- RAIDZ3: 至少需要五个磁盘
- log device: 至少需要一个专用设备,建议使用快速,低延迟,电源保护的SSD
- cache device: 至少需要一个专用设备,建议使用SSD
在添加卷按钮警告说, 现有的数据将被清除。换句话说,创建新卷将重新格式化选定的磁盘。如果要保留现有数据,请单击“ 取消”按钮并参考 导入磁盘和 导入卷来查看是否支持现有格式。如果是,请执行该操作。如果当前存储格式不受支持,则需要将数据备份到外部介质,格式化磁盘,然后将数据恢复到新卷。
4 块硬盘,用 RaidZ2 方式。 46. 47. 48. 开启 iSCSI 服务 49. 50. 12 ≤ 密码长度 ≤ 16 51. 52. 53. 54. 55. 56. 57. 58. 59. 60. 61. 62. 63. 64. 65. 66. 67. 68. 69. 在 iSCSI 属性中开启 CHAP 验证,选择组1。 三、Winodws 客户端配置 这里以 Winodws 7 为例 70. 71. 点击 "发现门户" 72. 73. 74. 75. 76. 点击 "连接" 77. 点击 "高级" 78. 79. 80. 81. 82. 点击 "取消" 83. 可以看到 iSCSI 磁盘了 二、linux客户端连接iscsi共享存储#安装配置 iscsi-initiator - [root@localhost ~]# yum -y install iscsi-initiator-utils
- [root@localhost ~]# service iscsid start
#连接到iscsi共享存储 - [root@localhost ~]# iscsiadm -m discovery -t sendtargets -p 192.168.1.230
- 192.168.1.230:3260,1 iqn.2011-03.org.example.istgt:iscsiwin8
- 192.168.1.230:3260,1 iqn.2011-03.org.example.istgt:iscsilinux
#登录到iscsi共享存储 - [root@localhost ~]# iscsiadm -m node -T iqn.2011-03.org.example.istgt:iscsilinux -p 192.168.1.230:3260 -l
- Logging in to [iface: default, target: iqn.2011-03.org.example.istgt:iscsilinux, portal: 192.168.1.230,3260] (multiple)
- Login to [iface: default, target: iqn.2011-03.org.example.istgt:iscsilinux, portal: 192.168.1.134,3260] successful.
#查看磁盘信息,可以看到多出一块硬盘设备。 [url=] [/url] [/url]
[root@localhost data]# fdisk -lDisk /dev/sda: 214.7 GB, 214748364800 bytes, 419430400 sectorsUnits = sectors of 1 * 512 = 512 bytesSector size (logical/physical): 512 bytes / 512 bytesI/O size (minimum/optimal): 512 bytes / 512 bytesDisk label type: dosDisk identifier: 0x000a43f1 Device Boot Start End Blocks Id System/dev/sda1 * 2048 1026047 512000 83 Linux/dev/sda2 1026048 419430399 209202176 8e Linux LVMDisk /dev/mapper/centos-root: 205.8 GB, 205759971328 bytes, 401874944 sectorsUnits = sectors of 1 * 512 = 512 bytesSector size (logical/physical): 512 bytes / 512 bytesI/O size (minimum/optimal): 512 bytes / 512 bytesDisk /dev/mapper/centos-swap: 8455 MB, 8455716864 bytes, 16515072 sectorsUnits = sectors of 1 * 512 = 512 bytesSector size (logical/physical): 512 bytes / 512 bytesI/O size (minimum/optimal): 512 bytes / 512 bytesDisk /dev/sdb: 107.4 GB, 107374182400 bytes, 209715200 sectorsUnits = sectors of 1 * 512 = 512 bytesSector size (logical/physical): 512 bytes / 512 bytesI/O size (minimum/optimal): 4096 bytes / 1048576 bytes[url=][/url]
#对设备进行格式化 [url=][/url]
[root@localhost data]# fdisk /dev/sdbWelcome to fdisk (util-linux 2.23.2).Changes will remain in memory only, until you decide to write them.Be careful before using the write command.Device does not contain a recognized partition tableBuilding a new DOS disklabel with disk identifier 0xd96b07f4.Command (m for help): nPartition type: p primary (0 primary, 0 extended, 4 free) e extendedSelect (default p): pPartition number (1-4, default 1): First sector (2048-209715199, default 2048): Using default value 2048Last sector, +sectors or +size{K,M,G} (2048-209715199, default 209715199): Using default value 209715199Partition 1 of type Linux and of size 100 GiB is setCommand (m for help): wThe partition table has been altered!Calling ioctl() to re-read partition table.Syncing disks.[root@localhost data]# partprobeWarning: Unable to open /dev/sr0 read-write (Read-only file system). /dev/sr0 has been opened read-only.Warning: Unable to open /dev/sr0 read-write (Read-only file system). /dev/sr0 has been opened read-only.Warning: Unable to open /dev/sr0 read-write (Read-only file system). /dev/sr0 has been opened read-only.[url=][/url]
#格式化完成检查 [url=][/url]
[root@localhost data]# fdisk -lDisk /dev/sda: 214.7 GB, 214748364800 bytes, 419430400 sectorsUnits = sectors of 1 * 512 = 512 bytesSector size (logical/physical): 512 bytes / 512 bytesI/O size (minimum/optimal): 512 bytes / 512 bytesDisk label type: dosDisk identifier: 0x000a43f1 Device Boot Start End Blocks Id System/dev/sda1 * 2048 1026047 512000 83 Linux/dev/sda2 1026048 419430399 209202176 8e Linux LVMDisk /dev/mapper/centos-root: 205.8 GB, 205759971328 bytes, 401874944 sectorsUnits = sectors of 1 * 512 = 512 bytesSector size (logical/physical): 512 bytes / 512 bytesI/O size (minimum/optimal): 512 bytes / 512 bytesDisk /dev/mapper/centos-swap: 8455 MB, 8455716864 bytes, 16515072 sectorsUnits = sectors of 1 * 512 = 512 bytesSector size (logical/physical): 512 bytes / 512 bytesI/O size (minimum/optimal): 512 bytes / 512 bytesDisk /dev/sdb: 107.4 GB, 107374182400 bytes, 209715200 sectorsUnits = sectors of 1 * 512 = 512 bytesSector size (logical/physical): 512 bytes / 512 bytesI/O size (minimum/optimal): 4096 bytes / 1048576 bytesDisk label type: dosDisk identifier: 0xd96b07f4 Device Boot Start End Blocks Id System/dev/sdb1 2048 209715199 104856576 83 Linux[url=][/url]
#指定分区格式 [url=][/url]
[root@localhost data]# mkfs.ext4 /dev/sdb1mke2fs 1.42.9 (28-Dec-2013)Filesystem label=OS type: LinuxBlock size=4096 (log=2)Fragment size=4096 (log=2)Stride=0 blocks, Stripe width=256 blocks6553600 inodes, 26214144 blocks1310707 blocks (5.00%) reserved for the super userFirst data block=0Maximum filesystem blocks=2174746624800 block groups32768 blocks per group, 32768 fragments per group8192 inodes per groupSuperblock backups stored on blocks: 32768, 98304, 163840, 229376, 294912, 819200, 884736, 1605632, 2654208, 4096000, 7962624, 11239424, 20480000, 23887872Allocating group tables: done Writing inode tables: done Creating journal (32768 blocks): doneWriting superblocks and filesystem accounting information: done [url=][/url]
#挂载并写入文件 [url=][/url]
[root@localhost ~]# mkdir /data/iscsi [root@localhost ~]# mount -t ext4 /dev/sdb1 /data/iscsi/
[root@localhost ~]# df -h
Filesystem Size Used Avail Use% Mounted on
/dev/mapper/centos-root 192G 1.4G 191G 1% /
devtmpfs 3.9G 0 3.9G 0% /dev
tmpfs 3.9G 0 3.9G 0% /dev/shm
tmpfs 3.9G 8.7M 3.9G 1% /run
tmpfs 3.9G 0 3.9G 0% /sys/fs/cgroup
/dev/sda1 497M 108M 390M 22% /boot
tmpfs 797M 0 797M 0% /run/user/0
/dev/sdb1 99G 61M 94G 1% /data/iscsi [url=][/url]
#设置开机自动挂载 echo "/dev/sdb1 /data/iscsi/ ext4 defaults 0 0" >> /etc/fstab
|
#检查 [url=][/url]
[root@localhost mnt]# cat /etc/fstab ## /etc/fstab# Created by anaconda on Fri Nov 10 19:40:13 2017## Accessible filesystems, by reference, are maintained under '/dev/disk'# See man pages fstab(5), findfs(8), mount(8) and/or blkid(8) for more info#/dev/mapper/centos-root / xfs defaults 0 0UUID=115aec57-6962-443e-9878-943f3e207a84 /boot xfs defaults 0 0/dev/mapper/centos-swap swap swap defaults 0 0/dev/sdb1 /data/iscsi/ ext4 defaults 0 0[url=][/url]
#查看并创建文件 [url=][/url]
[root@localhost ~]# df -hFilesystem Size Used Avail Use% Mounted on/dev/mapper/centos-root 192G 1.4G 191G 1% /devtmpfs 3.9G 0 3.9G 0% /devtmpfs 3.9G 0 3.9G 0% /dev/shmtmpfs 3.9G 8.6M 3.9G 1% /runtmpfs 3.9G 0 3.9G 0% /sys/fs/cgroup/dev/sda1 497M 108M 390M 22% /boottmpfs 797M 0 797M 0% /run/user/0/dev/sdb1 99G 61M 94G 1% /data/iscsi
[root@localhost ~]# cd /data/iscsi/[root@localhost iscsi]# touch test2[root@localhost iscsi]# lltotal 16drwx------ 2 root root 16384 Nov 22 11:30 lost+found-rw-r--r-- 1 root root 0 Nov 22 11:59 test2[url=][/url]
#卸载挂载的分区 [url=][/url]
[root@localhost ~]# umount /dev/sdb1[root@localhost ~]# df -hFilesystem Size Used Avail Use% Mounted on/dev/mapper/centos-root 192G 1.4G 191G 1% /devtmpfs 3.9G 0 3.9G 0% /devtmpfs 3.9G 0 3.9G 0% /dev/shmtmpfs 3.9G 8.6M 3.9G 1% /runtmpfs 3.9G 0 3.9G 0% /sys/fs/cgroup/dev/sda1 497M 108M 390M 22% /boottmpfs 797M 0 797M 0% /run/user/0[url=][/url]
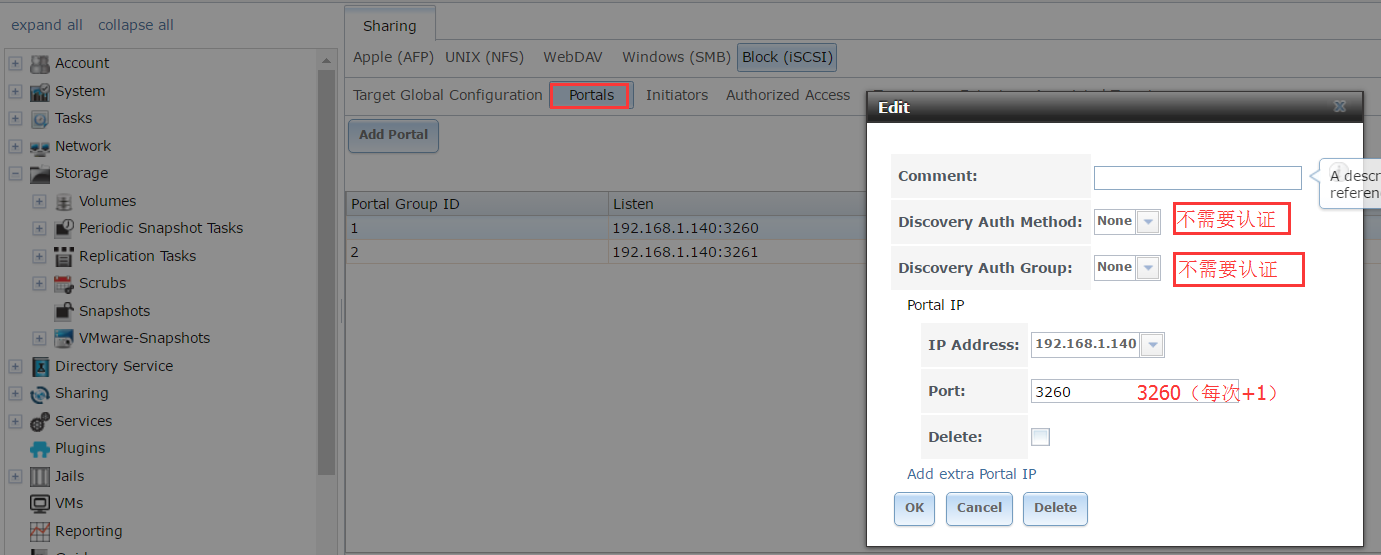
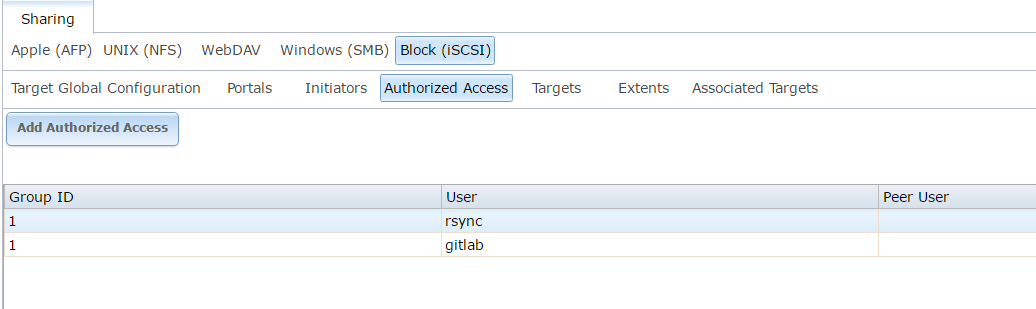
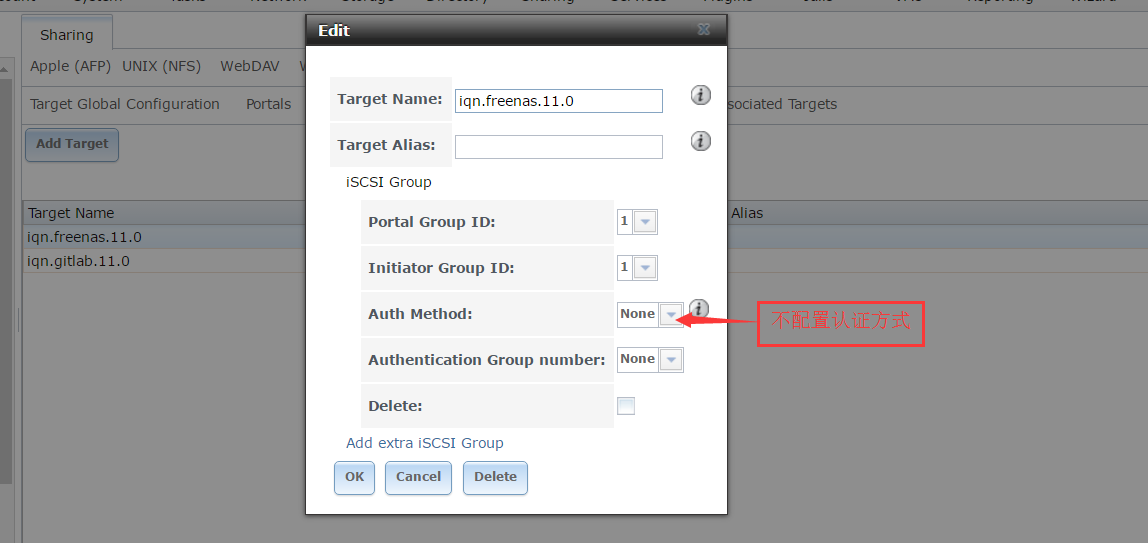
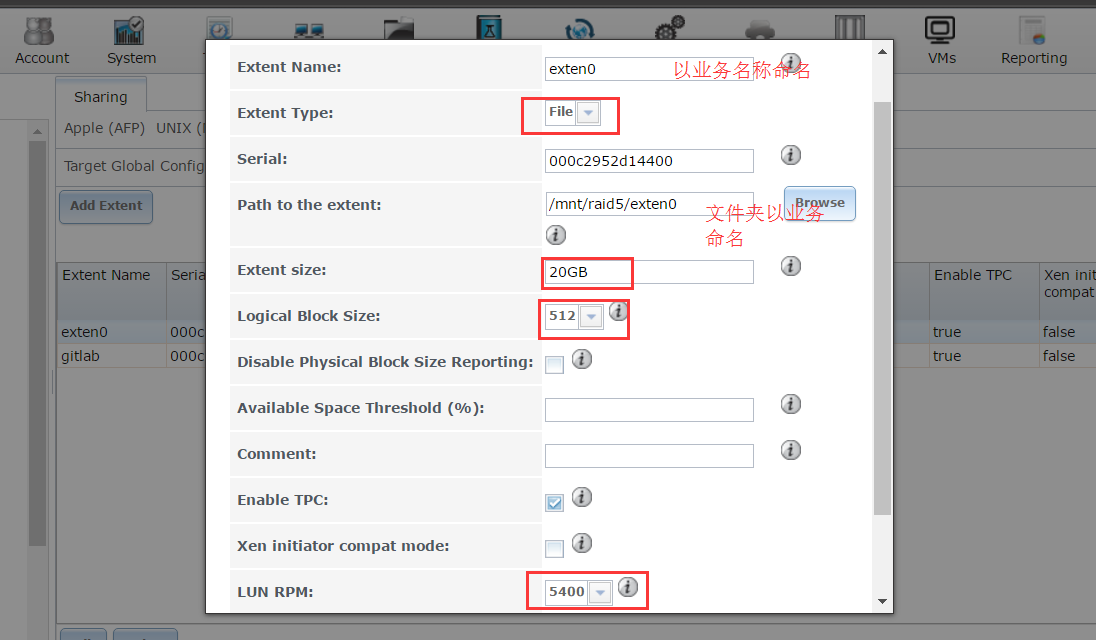
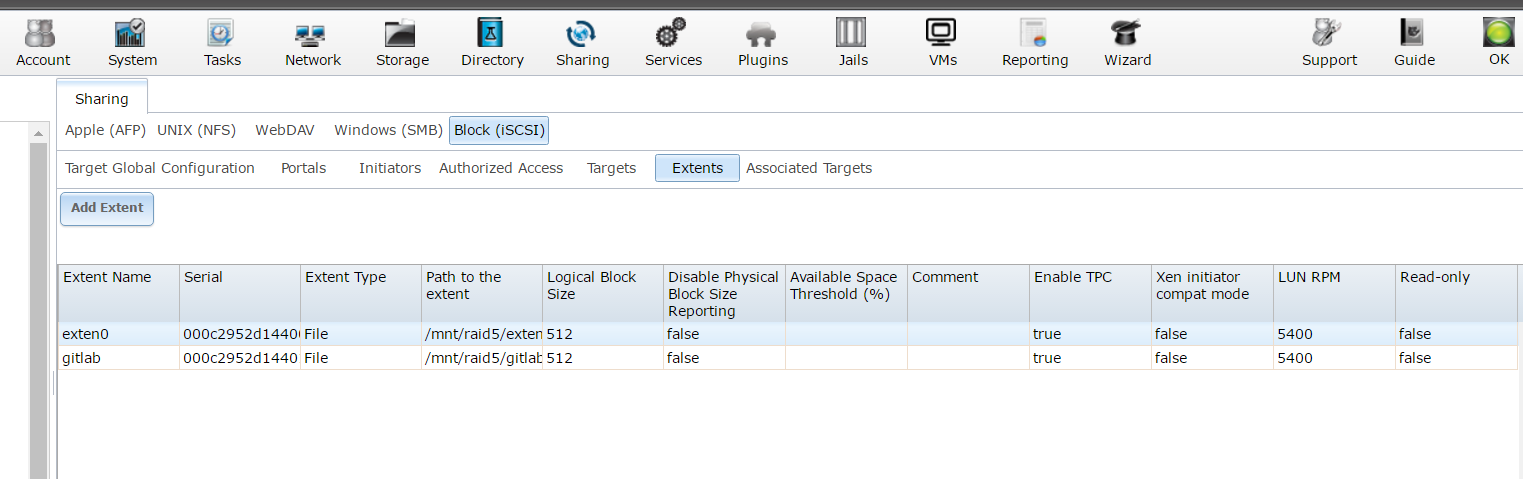
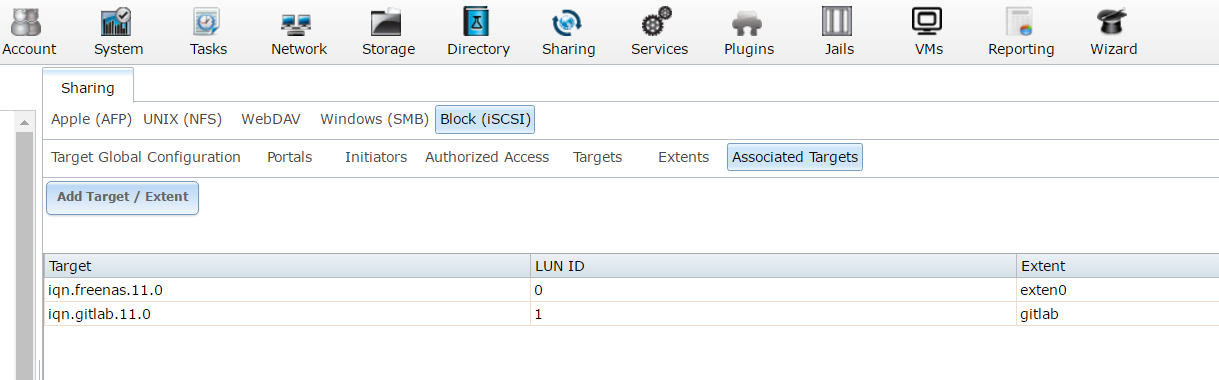
FreeNas11.04 配置iscsi 1、全局配置 2、采用不认证的方式 3、配置后的效果 4、配置认证网络 5、ALL 或192.168.1.1/24 (某一网段) 6、配置共享账号 配置共享账号效果如下: 7、配置Targent不认证方式访问 8、配置共享目录名称,位置,大小,硬盘RPM. 9、Extents配置完成效果图 10、设置Associated Targets 11、点发现(Discovery)---->Discover Portal:输入IP和端口号--->ok。(其它地方直接用默认设置,即可) 12、Targets(查看连接状态) 13、点磁盘管理,会弹出(检测到了新硬盘),指定GPT格式,再分区格式化,即可使用。 、 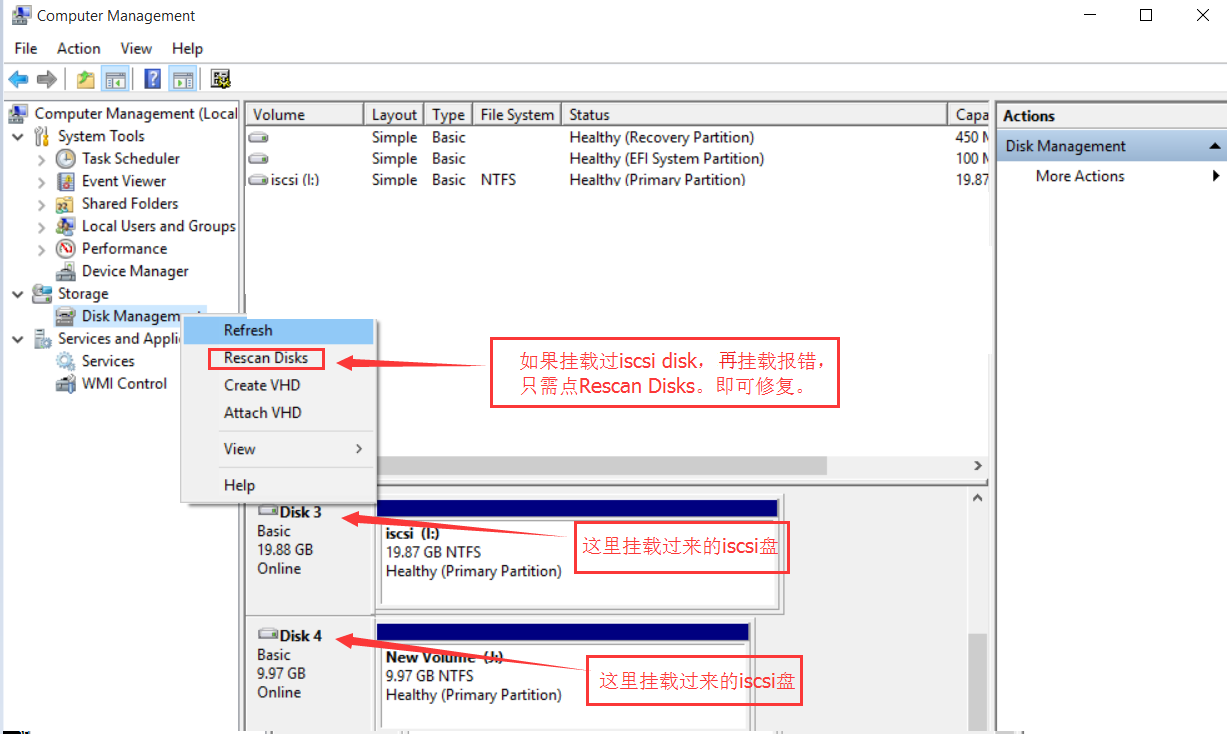 如果之前挂载过相同的iscsi磁盘,再挂载时会报错,只需点再Rescan Disks即可,修复。
14、linux下Targets连接方法 #注意他们的端口号是不一样的(备注:默认3260时,可以不指定端口号 )
[root@template ~]# iscsiadm -m discovery -t sendtargets -p 192.168.1.140
#如果改了端口号,在后面要指定端口号
[root@template ~]# iscsiadm -m discovery -t sendtargets -p 192.168.1.140:3261
192.168.1.140:3261,2 iqn.gitlab.11.0
|
15、登录到共享存储(备注:这里测试登录不同端口的共享盘) [root@template ~]# iscsiadm -m node -T iqn.gitlab.11.0 -p 192.168.1.140:3261 -l
Logging in to [iface: default, target: iqn.gitlab.11.0, portal: 192.168.1.140,3261] (multiple)
Login to [iface: default, target: iqn.gitlab.11.0, portal: 192.168.1.140,3261] successful.
|
16、卸载iscsi [root@next-cloud-server ~]# iscsiadm -m node -T iqn.netcloud.11.0 -u
Logging out of session [sid: 1, target: iqn.netcloud.11.0, portal: 10.0.101.6,3261]
Logout of [sid: 1, target: iqn.netcloud.11.0, portal: 10.0.101.6,3261] successful.
|
17、实现iscsi自动挂载磁盘 #配置iscsi自动发现
cat /etc/iscsi/initiatorname.iscsi
InitiatorName=iqn.netcloud.11.0 #重新启动服务
systemctl restart iscsid
systemctl status iscsid
systemctl enable iscsid #设置开机自动挂载
[root@next-cloud-server ~]# vi /etc/rc.d/rc.local
#!/bin/sh
#mount iscsi disk 5TB
sleep 10
mount -t xfs /dev/sda /data #授权
chmod +x /etc/rc.d/rc.local #添加服务
[root@next-cloud-server ~]# vim /usr/lib/systemd/system/rc-local.service # This file is part of systemd.
#
# systemd is free software; you can redistribute it and/or modify it
# under the terms of the GNU Lesser General Public License as published by
# the Free Software Foundation; either version 2.1 of the License, or
# (at your option) any later version. # This unit gets pulled automatically into multi-user.target by
# systemd-rc-local-generator if /etc/rc.d/rc.local is executable.
[Unit]
Description=/etc/rc.d/rc.local Compatibility
ConditionFileIsExecutable=/etc/rc.d/rc.local
After=network.target [Service]
Type=forking
ExecStart=/etc/rc.d/rc.local start
TimeoutSec=0
RemainAfterExit=yes
GuessMainPID=no #添加下面两行代码,实现rc-local作为服务启动
[Install]
WantedBy=multi-user.target #启动服务 systemctl daemon-reload systemctl start rc-local.service (备注:去掉这行)
systemctl enable rc-local.service
18、挂载分区5T 分区 fdisk /dev/sda g #大于5tb 再回车分区到完成 partprobe mkfs.xfs -f /dev/sda
mount -t xfs /dev/sda /data/
|


 发表于 2018-8-14 01:18:42